
Recording with Panopto
The instructions below apply when Panopto has been installed on your computer. The application is installed on most classroom computers.
By opening the course in Canvas and starting the recording there, you ensure that it is published in the correct place. Panopto recordings are published in Panopto Video linked to the Canvas course, and teachers can also allow recordings to appear as a page item in modules.
Start a recording
The instructions below apply when the Panopto recording application has been installed on your computer.
- Open the course in Canvas and click the Panopto Video link in the course navigation menu on the left. If Panopto Video is not in the course navigation menu, you first need to add the link there; see Course Settings and Navigation.
- Click the Create button and choose either Panopto for Windows or Panopto for Mac.

- Click the Open Panopto button. A pop-up window opens where you need to click Open Panopto Recorder. The Panopto application opens.

In Panopto
- The course folder is automatically selected in the Folder field. It is a good idea to check that it is correct.
- Give the recording a name. It is useful to include a title, a date, and the class period number.
- Choose the settings you want. See the explanation of the settings further down this page.
- Click the Record button to start recording.
Note: If you only need to record the computer screen without any webcam recording, you can start a new recording after the teacher image has first appeared. The recording window provides the option to record only what appears on the screen and without the camera image. You can also switch in and out of this mode during recording by clicking the Pause button (the button appears if you pause a recording once) and then the Resume button to continue recording.
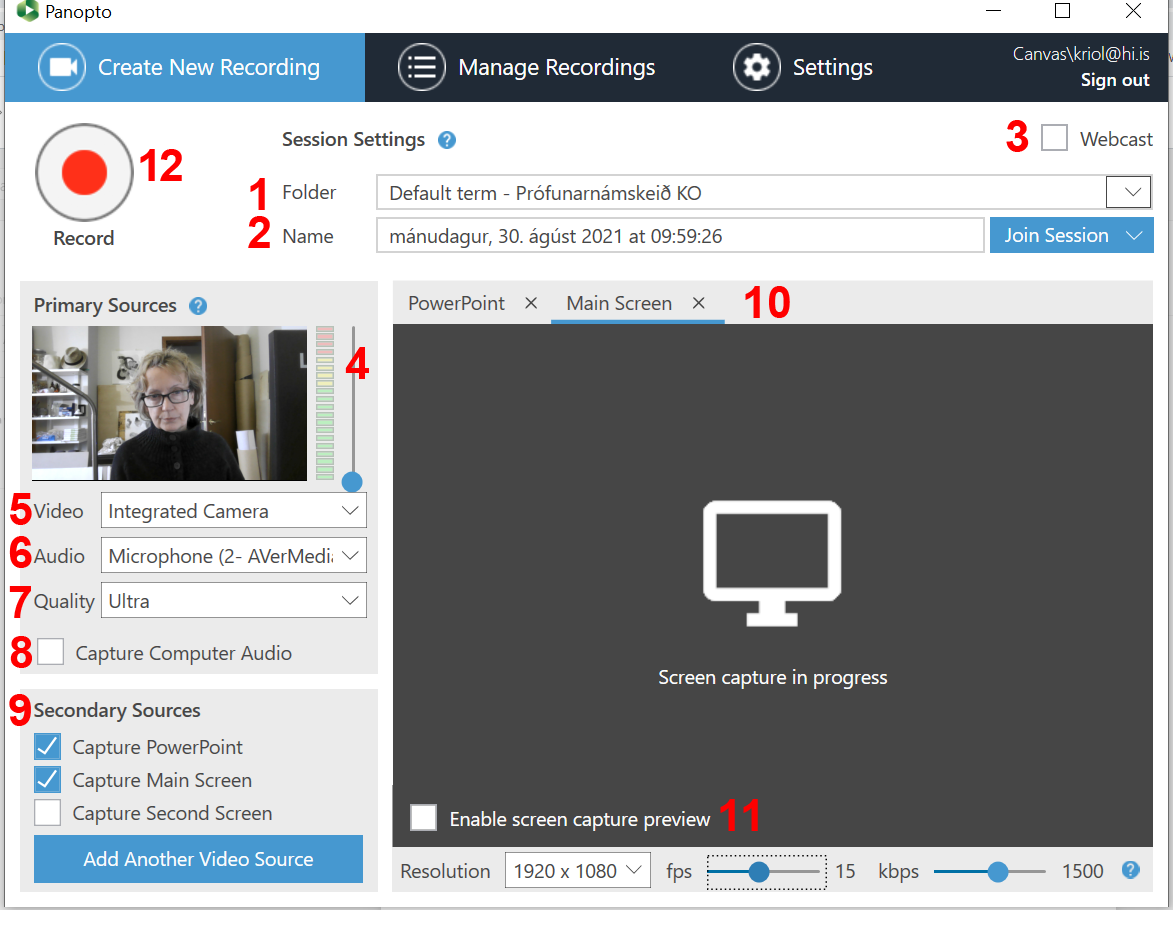
What is in the Panopto recording window?
Explanation of the settings:
- Folder – The folder selected here determines where the recording will be published.
- Name – The title of the recording. It is useful if it does not become too long but is still descriptive enough to help identify the recording.
- Webcast – This is where you enable live streaming of the recording. If you start a webcast, it is streamed over the web and can also be viewed in Canvas in real time, while the recording is also saved.
- HD Video – This drop-down menu is opened by clicking the small arrow next to the webcam image.
- Video – This is where you choose which webcam or other video source the application should use. If the teacher wants to show themselves, this setting must be selected.
- Audio – This is where you choose the microphone. It is important to test the sound. It is also possible to set the audio level using the level meter.
- Quality – Shows the selected recording quality.
- Capture Computer Audio – If selected, desktop audio is also recorded, which is useful if the teacher is playing audio or wants to use sound in a video clip. If audio only needs to be heard in the classroom, it is enough to connect a speaker to the computer’s audio output.
- Secondary Sources:
- Capture PowerPoint – Records the recording as a combination of slide images from PowerPoint. Panopto also uses the PowerPoint presentation to create an index for later search in the recording.
- Capture Main Screen – Tick this if you want to include what appears on the screen in the recording.
- PowerPoint/Main Screen – Here you can see which PowerPoint presentation is selected or whether Panopto is recording the computer screen at the moment (for example, if PowerPoint is not open or not running during recording).
- Enable screen capture preview – If selected, you will see a preview of what is being recorded. This is useful but can affect recording quality.
fps is the frame rate used to display movement. Fifteen frames per second (15 fps) is enough if there is little movement in the recording, but 30 fps is recommended if movement is more noticeable. Remember that a webcam generally runs at about 39 fps. If too much movement is recorded, the playback may become choppy. Note that it may be a good idea to test this before recording if you are planning to use a webcam over computer content.
kbps is selected automatically in relation to upload speed and fps, and there is rarely any reason to change it. - Record – The button used to start recording.
Stop recording
- Click the Stop button.

- You will then have the option to edit the recording and add a title and description. Click Done.

- You need to wait until the upload progress is finished, after which the recording will be uploaded to Panopto.


After that, the recording is published in Panopto Video, which can take some time depending on the length of the recording. If you close the recording window before the upload is complete, the recording will still become available in Canvas. If access should not be opened to students immediately after publication, see Restricting access to recordings.