Recording Attendance
00:07: How do I take roll call using the Attendance tool? 00:10: In Course Navigation, click the Attendance link. 00:14: By default role call displays the List View tab, which shows all 00:18: students in a list format. 00:21: To view the class in the seating chart format, click the Class View tab. 00:26: If your course includes sections, both views show a drop-down menu with the names 00:31: of course sections. To view students in a specific section, click 00:35: the Section drop down menu. Note that this menu displays even 00:39: if your course only contains one section. 00:43: By default, roll call will display the current date. You can edit 00:47: attendance records for a different date by using the Arrow icons next to the date 00:53: or by clicking the Calendar icon. 00:56: In the List View, you can take attendance by toggling the correct mark next to each 01:00: student's name. Click the attendance mark until you arrive at the desired 01:04: mark. 01:06: To mark the student as present and on time, click one time. 01:10: A green check mark icon displays. 01:13: To mark the student is not present, click two times. A red X 01:17: icon displays. 01:20: To mark the student as late, click three times. An orange clock 01:24: icon displays 01:26: To unmark the attendance status, leave the button as the default. 01:30: A gray no-symbol icon displays. The unmarked attendance status 01:34: also indicates an excused absence. 01:38: You can also take attendance by clicking the Mark All Present button. 01:43: If you need to start over or clear all attendance entries, click the Unmark 01:47: All button. 01:49: In Class View, you can also toggle the correct mark next to each student's 01:53: name, either present, absent or late, 01:57: or click the Mark All Present button. 02:00: To unmark all student entries, click the Unmark All button. 02:05: If you want to use roll call badges as part of the entry, view more options for 02:09: the student and add the selected badge. 02:13: This guide covered how to take roll call using the Attendance tool.
Recording attendance
The first time attendance is recorded, Canvas automatically creates the Roll Call Attendance assignment and a corresponding column in the Gradebook. This allows attendance to be included in the final grade. Do not rename, hide, or delete this assignment, as doing so breaks the connection between the attendance records and the Gradebook.
- Click Attendance in the course navigation.
- Select the date by clicking the calendar and choosing a date, or by using the arrows on either side of the date.

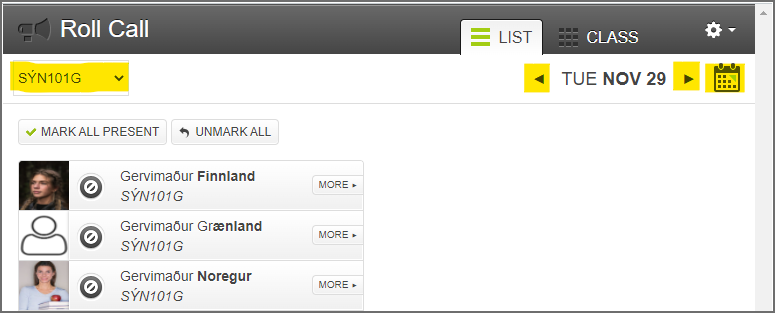
- If the course has been divided into sections, such as on-campus and distance students, use the section menu in the upper-left corner to display one section at a time.
- Click a student’s name to mark attendance. Click more than once to cycle through the available options.
- To save time, you can click Mark all present and then change the status for individual students as needed.
The available attendance statuses are:
- Unmarked
- Present
- Absent
- Late
It is not enough to mark only the students who are present. To keep attendance percentages accurate, you must also mark students who are absent or late when applicable. Attendance entries are saved automatically.
Additional notes
Roll Call Badges can be used to record extra information about attendance or participation. Teachers can also use Gradebook comments to add more detailed notes on a student’s engagement or attendance. Students do not see Roll Call Badges.
